Showing posts with label Preserving. Show all posts

Sunday, July 31, 2011

Eggplant -or- Why Does Baba ghanoush Have To Be So Ugly?

 If you're like most people, you don't really like eggplant.  That is unless it's breaded, fried, and covered with sauce and cheese.  I hear you.  It's weird.  It has a strange texture, color, and small when it's raw.  I wasn't a super fan of it growing up and didn't pay too much attention to it when I was an adult.  When I started getting buckets of it from my farm share, I figured I would try to find another way to eat it other than eggplant Parmesan.  By the way I use the recipe from the Joy of Cooking and it is wonderful. 

You can bread and fry the eggplant pieces and then freeze them.  Then all winter long you can pull out a slice here and there and put them on pizza, make eggplant parm or eat them with ranch dressing like my friend used to do when she was little...or not. 

However, if you've ever fried eggplant you know that it soaks up oil so effectively that I'm kind of surprised they didn't use it in the Gulf.  I don't really need to have that much breaded and fried stuff in my life so I ran a series of eggplant experiments.  First I made this really delicious dip with eggplant and butternut squash.  You actually make it in the slow cooker. It is really tasty but it doesn't freeze well.  So that was out. 

Then I started making Baba ganoush.  Seriously, this stuff is all gray and weird looking, but it is really yummy, but I expect that doesn't freeze too well either, so it's not really a preserving methods. 
This photo is from One Green Tomato.  I use her recipe, and I know what you're thinking, "that doesn't look ugly."  Well, she's a really skilled photographer, so don't be fooled, people don't want to eat gray food unless they already know it's delicious.
Then I came across a recipe in the book Preserving the Harvest for roasted eggplant and roasted red peepers layered with basil in an oil and vinegar garlic dressing. The first year I made twelve jars and thought, "What the Hell am I going to do with twelve jars of canned eggplant?"  I'll tell you what, eat the ever-living life out of it!! It is so good.  Even though it's made with vinegar it doesn't really taste pickled.  You can use them on sandwiches, pizza, salads, or chop it up or blend it in the food processor, spread it out in a shallow pie pan cover it with feta cheese and warm it up as a spread for pita chips or bread.  This stuff is incredible.  I gave a jar to my husband's grandfather for Christmas and he loved it.  I planned to make cases of it the following year (last year) but we didn't get a lot of eggplant, I'm not sure I got to make any.  This year I'm on it, though. 

Another thing I want to try my hand at is caponata.  Seeing as though this is a Sicilian dish and I am Sicilian by marriage I figured I ought to.  People say it freezes well, and I believe them.  It ca also be canned, and everyone seems to love this book for the recipe.  I'll let you know how it goes. 

Happy Eggplanting!

Friday, September 17, 2010

The Best Tomato Soup IN THE WORLD!

Well, I haven't had all the tomato soup so maybe I can't know for sure, but this soup is pretty awesome and we have eaten a whole mess load of it in the past month.  I got the inspiration for it here. But we are pretty much dairy-free over here so I had to tweak the recipe a bit. 
Ingredients:

About 6 pounds of tomatoes (any tomato will work, but Roma tomatoes will have more meat in them and give you a slightly thicker soup)
3 Tablespoons of olive oil
1 large onion
4 cloves of garlic (more or less to taste)
4 large carrots
1 cup cashew cream* (or heavy cream, or light cream)
salt, pepper, herbs such as oregano, basil, thyme, or whatever you like.  I just put in an ice cube of pesto from the freezer

Preheat oven to 400 degrees. 
Cut tomatoes in half, trim the stem end and place them on a baking sheet lined with parchment paper cut side down.  Don't worry about peeling them, when they're done roasting the skins will slip right off.  Roast for 30 minutes.  Let cool slightly so you can handle the skins without damaging yourself.  Pull off the skins.

Heat the olive oil in a soup pot and saute onion and garlic until soft.  Add carrots. Add tomatoes.  cook on a low simmer until carrots are soft. 

Alternately you can skip all the steps after roasting the tomatoes and throw everything in the crock pot and cook on low for 2-4 hours until the carrots are tender.

Use an immersion blender or a blender in batches to puree the soup. 

Stop here if you'd like to freeze the soup.

Add cashew cream (or the cream you're using) and drop in your frozen pesto, if using.  Heat the soup back up slowly.  If you use real cream make extra sure not to let it boil. 

Yay!

Cashew Cream?

Cashew cream is the best thing in the whole world if you avoid dairy and even if you don't!  I have used it in this soup and in a corn chowder and neither of the soups have that, "this should be cream, but clearly we're dealing with hippies with some sort of dairy-free notion and they refuse to use the good stuff" taste.  Really, it adds something magical to soups.  You make it using raw cashews , which don't have the strong flavor of cashews you're thinking about.  It's thick and creamy and gives the soup a deep flavor. 

This is how you make it:
Measure 2 cups raw whole cashews (pieces tend to dry out) and cover in cool water.  Put bowl in the fridge over night.  Drain the water and put the cashews in a blender and cover with water (about an inch over the cashews).   Blend it until it's smooth.  I have heard the suggestion to strain it if there are any tiny pieces in it your blender couldn't take care of, but I never had that issue and my blender wasn't the best.  Try it!  It's sooo good!

Thursday, August 26, 2010

Tomatoes

If August were a woman she would be draped in red, with long red hair, and a fiery temper.  I'm pretty sure she just stormed into my house dumped a bunch of tomatoes and zucchini on my kitchen floor, looked at me lovingly, and, just as I was getting used to having her around, said she was about ready to leave.  Sigh.  That is the way of passionate love affairs, I guess.  When it goes that way, you can usually console your self with a zip-up hoodie your fiery-tempered lover has left behind in their haste.  In this way August's leaving me is similar.  She is leaving her bounty for me to savor while she slips out the door and the slow, cool comfort of Autumn takes her place. 
Last year, with the blight, there was scarcely a tomato around.  I bought a box of sauce tomatoes from a local farm and made a batch of ketchup that wasn't very good.  Well, it was good, but it wasn't ketchup.  If you thought of it as tomato spread, or something like that it was alright. But if you sat there with your french fry and thought, "I can't wait to have some ketchup," you would find yourself disappointed.  The spices were too strong and all wrong.    It did, however, make a mean BBQ Sauce. 

This year there are tomatoes! It is very exciting. So far, I have preserved them by:

1. Roasting and Freezing:  Set your oven to 200 degrees, cut Tomatoes in half and line a baking sheet with parchment paper, and place tomatoes on the sheet cut side down.  Roast for 2 hours.  When they come out of the oven, let them cool so you can touch them.  The skins with just slip right off.  Pack a mason jar 2/3 full only! (the jar will crack in the freezer if it's more than that), and pop it in the freezer.  These can be used later for sauce or soup.  The roasting makes the flavor absolutely incredible. 

2. "Sun Dry" (dehydrate):  I sliced the big tomatoes into thirds and dehydrated them in my electric dehydrator for about a day.  The plum tomatoes I sliced in half and dehydrated them for longer.  The manual says it shouldn't take this long, but that's how long it took.  I am still having trouble finding the right consistency.  I know they should be leathery, but when they are they still seem wet, and I don't want them to mold.   So the truth is some of them are a little crisper than usual.  I'll have to soften them in water before I use them.  I have also dehydrated the cherry tomatoes. We had an abundance, and I couldn't figure out what to do with them.  We sliced them in half and dehydrated them (they are doing this right now) and I will pack them in olive oil in jelly jars. 

3. Tomato Jam:  What's tomato jam?  I don't really know.  It seems like it's similar to ketchup bu not as thick.  My two-and-a-half-year-old says, "I yike dis tomato jam, Mama."  I took the recipe from The Big Book Preserving the Harvest. 

4. Tomato Sauce:  This recipe I took from Ball Complete Book of Home Preserving.  It is a water bath recipe, which means that it doesn't have to be pressure canned.  It has lemon juice added to boost the acidity so we don't get botulism.  I also boiled the ever-living life out of that stuff.  So hopefully we won't all die from a home cooked spaghetti dinner. 

I am hoping to make some salsa, some real ketchup, and some more tomato sauce.  I don't really have enough right now to make it through winter.  I think more than likely I will be spending the weekend gathering sauce tomatoes and canning.  Which is fine, really.  Now that the summer is coming to an end, my panicky feelings that it won't be enough are (mostly) turning into contended feelings of having done the best I could.  And after last year, I'm grateful for any tomatoes.

Saturday, July 24, 2010

Blueberries: The Continuing Saga


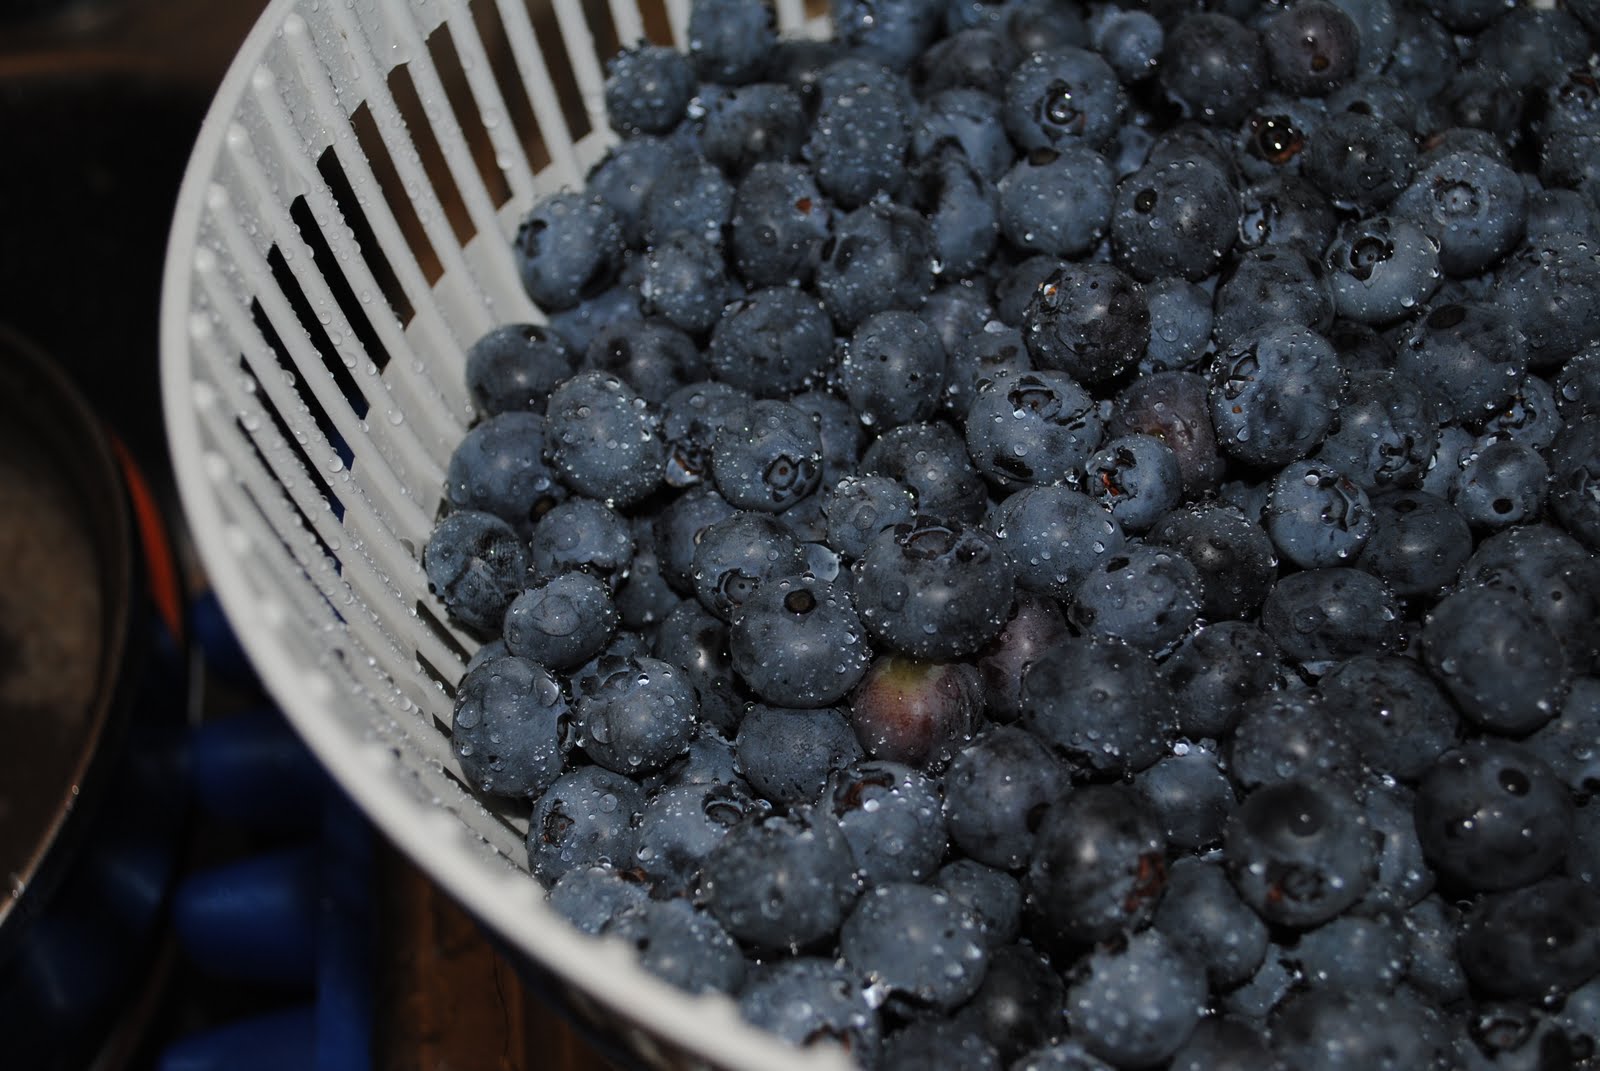
While I waited patiently for the wild blueberries to get a move on and ripen up, the cultivated bushes are gong nuts all over the place around here.  Peak season can often mean discounts for bulk.  We don't want to miss out on things like that, so thanks to my lovely aunt and cousins who watched my children all day while I drove to Tougas Family Farm and picked blueberries for three hours.  I just made the 25 pound discount.  Only just!  It takes s a long time to pick tiny fruit off a bush.

After about 45 minutes or so, the field I was in started to clear out until I was the only person left in that area.  I stood in front of the same 4-6 bushes for the entire time (they were laden with ripe fruit), with no sound but the wind in the pines and the birds over head.  Silence.  Those of you with children may have a hard time understanding me here.  What I mean to say is: there was no sound.  For two full hours.  I'm not sure I've had that experience in a couple of years at best.  It was magnificent.  So much so, that a couple of times I got kind of choked up.  I didn't full on cry, but I came close. 

When I got home it quickly became clear to me that my children could easily eat 25 pounds of blueberries in one sitting. so I took them away. I filled a couple of pints and put them in the fridge for snaking.  I have frozen 12 pounds.  To freeze them I just laid them on a baking sheet lined with parchment  paper in one pound batches (about three cups) and froze them.  After that I put them into mason jars.  I would have probably vacuum sealed them but I was out and it seems a little easier to get at this way, I can take as little or as much as I need.  They do, however take up more space in the freezer this way, so I may have to vacuum seal them later anyway.

I also took 3 pounds and made 4 pints of blueberry juice concentrate (instructions here).  With this I will be able to make refreshing blueberry juice and berry sumacade during the winter.  I am planning to make 12 jars of jam tonight (if I don't choose to go to bed instead) and will dehydrate about four pounds into fruit leathers, which I hope come out better than my strawberry fruit leathers
These 25 pounds will most likely take care of my yearly blueberry needs.  I went back with the kids the next day and we picked for pleasure an even got some peaches.

 We took home about three pounds, which are being turned into pancakes, snack, and dinner. 
Athena Made this lunch herself!
While I was out in the blazing heat picking the cultivated berries, the precious wild berries were ripening.  I made plans with my friend Kerry, fellow mother and earth lady, to meet in the woods behind Target.  She would bring her two boys and I would bring my big girl.  We got up early, grabbed our buckets and our cups on strings (these are to hang around your neck to free up both hands for picking) and tromped into the woods.  The bushes were covered! It was a much better show than the week before.  Athena got right to picking, just as I thought she might.  We hadn't been in the woods 10 minutes before Kerry's little one, James, let out an ear piercing scream.  He had been stung by a bee.  His momma managed to calm him down and he was game to keep picking (and eating) the tiny wild berries.   We got back into our groove and there was another ear piercing scream.  This time from Athena.  It kind of started as a whine and so at first I didn't think she was hurt.  She's four-and-a-half and whining happens a lot around here.  But within seconds, I realized she too had been stung by a bee.  I could see the little guy on her pants.  I pulled the pants away from her leg, but there was still screaming.   I picked her up to carry her to the path and over her shoulder I could see Kerry's horrified look, "She's covered in bees," she said.  Sure enough Athena had a bunch of bees on her pants.  We stripped them off and her poor little legs were covered in at least ten stings.  Luckily I had made toothpaste the night before and had brought some for Kerry to try out.  She ran to the car to get it and I put the baking soda mixture on all the bites. I guess it neutralizes the sting. It seemed to make a difference.  But the bees wouldn't leave her pants alone.  I think she probably got more peach juice on her pants than I had realized before leaving the house.  To make matters worse, they were inside out, so there were bees all up in her pants.  Kerry got a stick and tried to get the bees out, because, you know, she had no pants on, but while the attempt was being made, James got stung again.  Off came his pants.

"Just leave the pants here, I'll get them another time!"  And out we ran, about a third of a cup of blueberries between us and two kids with no pants on. 

Back at the van, while we waited to see if our kids were going to go into anaphylactic shock, I ran into Target to get Athena something to wear.  When I got back and gave her a dress, she was very pleased, and not suffocating.  So all was good.  We relaxed a bit.  The kids ate some pretzels.  I spent my time feeling horrible.  I had led my new friend, her children and my own first born into a bee hive.  Traumatizing children is not part of my wild edibles MO. My revelry of self-loathing was interrupted by yet another ear-piercing scream.  Apparently the bee that had been hanging out on James for the past 20 minutes had decided to sting him. Poor kid! So we made everyone take their clothes off and reinspected them for bees. 

We all calmed down again.  The kids listened to music and the mothers discussed the resilience of children.  We eventually decided to run our errands at Target so we could at least say we got something done.  We walked along the edge of the parking lot, the ripe, plentiful blueberries teasing us all along the way.

"Ain't nothin' in this world is free, baby," they said, "take the bad with the good and come on over."

We (the moms) decided we would find something in Target to occupy our children, and after our errands were run, we would come back out and pick some more.  And so we did, Kerry pulled up her van, parked it sideways and opened the door.  We sandwiched the kids in between the van and the edge of the parking lot.  Armed with a new box of sidewalk chalk we told them to "stay in between these white lines" and went into the woods to pick blueberries.  Really, we were right there, just up a two foot slope.
 Athena and James sitting on the curb, the blueberry forest in the background.  Athena is admiring her "sorry-you-got-stung-by-ten-bees-and-we-had-to-leave-your-pants-in-the-woods" dress
Eventually, they heard the saucy call of the blueberries and came up to join us, picking and eating to their heart's content.  They were not even scarred for life a little bit.  In under an hour we both picked about two cups.  This is really not so bad for wild bushes.  We didn't travel far and could have gotten a lot more with a little more time and a little less kids.  We are working out a way to go back without the little angels. 

I feel like I have passed some sort of initiation.  This is my first utterly ridiculous time collecting wild edibles.

Blueberry Juice Concentrate

I found this great idea here at mother Earth News.  I did it last year with my blackberries, and will be making a lot more this year.  I started with blueberries this year.  The juice concentrate can be turned into a drink any strength you like, from a really sweet juice to something more like fruit water.

It's super easy too!

1.  Thoroughly rinse berries, and place them in a heavy pot with just enough water to make them bob. (I used 3 pounds of blueberries and 4 cups of water) Bring to a slow boil, mash with a potato masher or spoon, bring back to a boil, and remove from the heat. Cool slightly.
 2.  Pour the mashed berries into a jelly bag or a colander lined with several thicknesses of cheesecloth. Collect the juice in a bowl.
3.  Return juice to the pot and sweeten to taste with sugar, honey, or other fruit juices (such as pineapple). I warmed the juice back up a bit to help the sugar melt. Under-sweeten, because you can always add more sugar later, but you can't restore lost tartness. (I used about 1/2 cup of raw sugar) At this point you have a concentrate, which can be diluted with 3 to 4 parts water.
4. Pour it into clean hot jars, leaving half an inch headspace and seal. Or  freeze your concentrate in ice cube trays or small freezer containers.
 5. Process in a water bath canner for 10 minutes. Most berries are naturally acidic, but when canning concentrates from softer fruits like plums, add a teaspoon of lemon or lime juice per cup, just to be safe.

Friday, July 23, 2010

Zucchini Bread, Two Recipes

The Zucchini has landed.  There is a lot of it, and it is taking over my kitchen.  I have made some zucchini pickles (which are really good, by the way), purchased a really neat vegetable peeler that peels veggies into noodles, and made fried zucchini (Joy of Cooking's recipe).  All of that is well and good, but I've also made some zucchini bread!
I found a recipe here, and changed it a bit halving the sugar and using all white whole wheat flour instead of some white and some whole wheat.  I made both recipes side by side to see the difference and mine was better.  Well, it was less sweet and rose higher.
 
Isn't the difference in quality startling!? (Mine is on the left)  That was a joke, I know it's not easy to tell.  If you squint and tilt your head you can see that the one on the left is a little lighter in color, it also had a nicer formed top. 
Then I changed the recipe even more! I replaced the sugar with honey, used some whole oats, and added nuts and fruit.  This bread is suitable for breakfast. I am always trying to make treats that can be eaten any time, like my breakfast cookies

First the traditional:

Ingredients:

1 cup canola oil
3 eggs
1 t. vanilla
1 cup sugar
3 1/2 cups white whole wheat flour (If you can't find this flour, use 2 1/5 cups white and 1 cup whole wheat)
1/2 t. salt
2 t. baking soda
1 t. cinnamon
1/2 t. nutmeg
2 cups grated zucchini
*1-2 cups raisins, nuts, or dairy-free chocolate chips, optional

Preheat oven to 350 degrees.  Grease and flour 2 loaf pans. 

Whisk together all the dry ingredients in a medium bowl. In a large bowl beat together oil, eggs, sugar, and vanilla until light in color. Add dry ingredients to the egg mixture one cup at a time.  The batter will seem like it's not wet enough, this is because the zucchini is giving the bread most of its moisture. Stir in zucchini and optional ingredients. Spread into two loaf pans. Bake one hour or until a toothpick inserted comes out clean.

I've made 8 loaves of this (so far) to freeze.  Yum.

The top is the breakfast bread, the bottom, lighter bread is the recipe above. You can see how much darker the honey makes the bread. This loaf was also a little over cooked.  After I made this I tried the recipe in a 9x13 glass pan, and that was way better. 

Breakfast Bread

Ingredients:

1 cup canola oil
3 eggs
1 t. vanilla
1 cup honey
3 cups white whole wheat flour (If you can't find this flour, use 2 1/5 cups white and 1 cup whole wheat)
1/2 cup whole oats
1/4 cup flax meal (you could leave this out if you don't have any)
1/2 t. salt
2 1/2 t. baking soda
1 t. cinnamon
1/2 t. nutmeg
2 cups grated zucchini
1/2 cup raisins
1/2 cup dried fruit (I used blueberries)
1/2 cup sunflower seeds
1/2 cup chopped walnuts
 whole oats and shredded coconut to sprinkle on top (optional)

Preheat oven to 325 degrees.  Grease and flour a 9x13 baking pan. 

Whisk together all the dry ingredients in a medium bowl. Combine nuts and fruit in a small bowl, set aside. In a large bowl beat together oil, eggs, honey, and vanilla until light in color. Add dry ingredients to the egg mixture one cup at a time.  The batter will seem like it's not wet enough, this is because the zucchini is giving the bread most of its moisture. Stir in zucchini and fruit and nut mixture. Spread into pan. Sprinkle with whole oats and some coconut, if desired. Bake 45 min- one hour or until a toothpick inserted comes out clean.  Honey browns faster than sugar, so the loaf will be a bit darker, but keep and eye on it at the 45 minute mark. If a toothpick comes out mostly clean at 45 minutes, I'd take it out.  The edges may get over cooked and dry if you leave it in.  If you're married to the loaf shape versus the cake shape, try baking it for only 35-40 minutes in the loaf pan instead.

Wednesday, July 21, 2010

Onions

I pulled our onions the other day.  They're not super huge, they're the size I would use if a recipe called for a medium onion.  A few are pretty small, but on the whole I think they're a good size.  We got about 45 or so; I figure if I can keep my onion use to say...3.75 per week I'll have enough for the year.  That doesn't really seem like enough. However, I have a large bundle of smaller onions from our farm shares, so if that lasts me through the summer, then 45 onions for the year seems a little bit more possible.  But only a little bit.  I'm pretty sure I use more than one onion a week, it's probably closer to one a day.  There's a big gap between 45 onions and 365.  If I do use one onion a day, then I'm 320 onions short. That's a lot!

These onions were started from sets.  They (the Gardening Gurus of Lore) say that onions started from sets do not store as well, so I'll have to see if these onions are even capable of getting me through the year.    We have tried to grow onions from seed twice and have failed both times.  We actually have bad luck with seeds started indoors.  But I'll go into that in more detail in a post entitled something like, "I Hate Starting Seeds Indoors; Why Can't We Just Buy Our Plants From A Nursery And Plant Them On Memorial Day Like Everyone Else,"  or something.

All in all, I'm happy with these onions.  They look like real onions, which is exciting.  More than likely they taste like real onions because they smell like real onions. They might be a little to few and a little small, but they're my onions and I love them.

Monday, July 19, 2010

Wax Beans

I had an over load of beans recently.  I eat them, and one of my girls will eat them happily (the other eats them unhappily).   But there were too many for us, so, I decided to freeze them for later. I blanched them according to their proper timing (3 minutes) and vacuum sealed them.  Two pounds all set!  Last year I noticed a complete lack of whole veggies.  I didn't have anything that could just be eaten on the side of the plate.  It all had to be put into a soup or casserole, so I'm trying to be a little more mindful of preserving things that are in their entirety and hold up well to the freeze. 

Viola! All ready for the freezer!

Thursday, July 15, 2010

Zucchinni Pickles and a Lesson in Reading the Directions.

 I just erased a nice chipper paragraph I wrote before I typed in the directions.  The paragraph wondered what the pickles would taste like, and told you how sweet they were. It may have even said something about how pretty they look in the jar, or pointed out the cool vintage labels my aunt found for me.  I erased it because after typing in the directions, I realized I didn't follow them properly and will more than likely have to make them over again.  Bummer.  What I didn't do was get the air bubbles out, which, now that they have risen out, means that there isn't enough liquid to cover the pickles.  I also didn't leave the jars in the hot water for 5 minutes after I took the lid off the canner.  I threw some of the jars in the fridge, If we're lucky we'll be able to eat a few of them before they go bad.  I'm not really even sure what would happen.  I don't think you can get botulism form pickled things, please correct me if I'm wrong about this.  Either way, I'll be too wigged-out come December to actually eat them. They'll get opened and poked at, set on the door of the fridge like we're going to eat them, when people come over we'll say, "Oh yes, those are our zucchini pickles." And eventually, they'll find their way into the compost.  So, I figure they are fine now if they are refrigerated, and we'll just find it in our hearts to eat 10 pints of zucchini pickles before they "go bad" (whatever that means).  So take my lesson and really read through the directions thoroughly before you start.  In fact take another lesson and don't start a a 4-hour canning adventure at 8:30 at night.  Go to sleep if you're too tired to read the directions. 

I got this recipe from Ball Complete Book of Home Preserving.

Zany Zucchini Pickles
14 cups diagonally sliced zucchini
1/2 cup pickling or canning salt
cool water
6 cups white vinegar
4 cups granulated sugar
4 tsp mustard seeds
2 tsp celery seeds
2 tsp ground turmeric

1.  In a glass or stainless steel bowl layer zucchini slices with pickling salt. Cover with cool water and let stand for 2 hours.  Transfer to a colander in a sink and let drain.  Rinse with cool running water and drain thoroughly.

2. In a large stainless steel saucepan, combine vinegar, sugar, and spices.  Bring to a boil over medium-high heat, stirring to dissolve sugar.  Reduce heat and boil gently for 5 minutes, until spices have infused the liquid.  Stir in zucchini. Remove from heat, cover and let stand for 1 hour.

3. Meanwhile get your jars and canner ready.

4.  Return saucepan to medium-high heat and bring zucchini mixture to a boil, stirring occasionally. Reduce heat and boil gently for 5 minutes, until zucchini is heated through.

5. Pack zucchini into hot jars to within a generous 1/2 inch of top of jar.  Ladle hot liquid into jar to cover vegetables, leaving 1/2 inch headspace. Remove air bubbles and adjust headspace, if necessary by adding hot pickling liquid.  Wipe rim.  Center lid on jar. Screw band down until resistance is met, then increase to fingertip tight.

6. Place jars in canner, ensuring they are completely covered with water. Bring to a boil and process for 10 minutes. Remove canner lid.  Wait 5 minutes, then remove jars, cool and store. 

*Also I have added another tag: "Mistakes." We harvest as many of those around here as anything else.  Better me than you!

Sunday, July 11, 2010

Raspberries! -or- A Demo of all the Juicers I Own.

Strawberry season is gone. The next fruit around here is raspberries.  Onward we have moved!  I have to go elsewhere for our raspberry-lovin' needs, we don't grow raspberries (yet).  There is a local farm around here called Gerry's, and the people there are so helpful.  They have given me countless tips on gardening and preserving.  They never seem too busy to stop and say hello and catch up a little bit.    AND they are the kind of farm that has canning and sauce produce available when you ask.  This is great because you can often yourself with a lot of berries for less money and with a little bit more work of picking though them, a lot of jam!  I ended up getting 10 jars of beautiful raspberry jelly. 
I decided to go with jelly this year and not just mush of the berries because the seeds drive me a bit bonkers. We use a lot of our jelly to flavor oatmeal in the winter and the seeds are really noticeable.  I like jam with big chunks of fruit, I love how extra homemade it seems, but the seeds!  I also happen to have an amazing, wonderful, incredible Squeezo!
 This monster of homesteading bliss was given to me by my grandmother who found it at a yard sale.  I didn't even know what it was! There are so many projects I wouldn't even consider doing without it (we'll talk about that during tomato and apple season).  They come with (or you can purchase) different screens depending on your job.  So I clamped it to the counter and we got to work!
You simply place your raspberries in the hopper and crank out juice! It's that simple! 
 Berries in top (don't you love this heath-code nightmare?  don't' worry, the jelly is hair-free)
Juice comes out this way,
Seeds go out that way! Notice how clean the seeds are of juice.
Well, it's usually that simple.  I found that after a while the scroll, which is like a drill that is inside the screen,was getting full of seeds and it was then mushing the seeds up and pushing them out into the juice.  Ew. So I took it apart, cleaned it out and put it back together. It worked for a while, but the same things started to happen again.  I began to suspect that we had the wrong sized screen.  This is what it say here: The parts for today's Squeezo will fit most older Squeezo models; however, if your Squeezo is over 20 years old, we recommend you call us to check proper sizing. 
  
So, I thought I'd  take out the juicer I used last year.  I'm not even sure what it's called.  
You put your berries in the cone and use a cone-shaped pestle to push the juice out the sides.  It doesn't get the seeds quite as clean as the Squeezo does, but it works well enough.  
Well, maybe not so well enough.  I knew how much juice I was loosing after using the Squeezo.  I happen to have another knock-off Squeezo that I got last year from the same grandmother who found me the real deal.  I thought I'd get that out and see if it would get the last bit of juice off the seeds. 
 As you can see, many of the parts are plastic, and the screen is covered, so you can't watch he magic happen! But we gave it a shot.  
FAIL! As you can also see, the fake Squeezo (let's call it a "Feezo") didn't get the seeds nearly as clean as the Squeezo.  I ended up getting about another 1/2 cup of juice from the Feezo. 
Look at all that potential jelly!  It all went to the chickens.
 
 Later that night, when it wasn't 4 million degrees and only a balmy 2 million I boiled up the juice and made jelly.  I also brought a gigantic canning pot to a boil and processed the jars this time
All in all, a successful day. 

Monday, July 5, 2010

Greens! Greens! Greens!

 Last February, when we could no longer put together a full meal with what we had preserved from the summer, I practically ran to the grocery store and brought tons of lettuce.  I wanted greens so badly that I think I would have been capable of absorbing the nutrients through my skin had I laid the leaves all over my body like a freaky stay-at-home-mom wood nymph.  I had a couple of salads here and there, don't get me wrong.  I host a weekly potluck and people would bring a salad, and I would eat the whole thing, or I would go to some one's house and they would have a salad and I would eat the whole thing there. 

"You know they sell this stuff at the grocery store," they would say.
"Yeah, I know, but I'm trying to do this thing here. Is this cucumber?!"

This has inspired us to check out Elliot Coleman's book, Four-Season Harvest, and build ourselves some cold frames.  We also chose a variety of seeds, that when planted in the late summer, should bear leaves for our munching mouths well into the winter. 

But that was over the winter.  Now that the lettuce is free flowing (at least for another week or so), now that there is kale, endive, tai soi, spinach, arugula, and mustard greens, well, I just can't seem to eat it all.  Funny right?  So I've taken the least desirable stuff, or at leas the stuff I can't eat all day long (like mustard greens) and put them in the freezer.
A couple of years ago we acquired two contractor-grade trash bags full of tai soi.  It was the end of the Harvest at our CSA and they just couldn't spread it around enough.  We figured if we didn't eat it all we could at least give it to our chickens.  But eat it we did!  We chopped, washed and vacuum sealed the whole nine-thousand pounds of this slightly bitter green.  We only just finished eating it this past winter, in fact.  When it was thawed out it was pretty mushy and chewy.  I only learned after the fact that most veggies need to be blanched before they are frozen. This is because blanching destroys the enzymes that allow the veggies to ripen and to rot.  It also sets the color and preserves the nutritional content and flavor.  In short, it prevents thawed greens from tasting like chewy mush fit only for pureeing and hiding in spinach bread and other such things.  There is great information about blanching and freezing veggies here, at the National Center for Home Preservation including a chart with blanching times.  (Here they have a chart from the Joy of Cooking, it includes some other veggies).  Timing is important because under blanching just speeds up the ripening/rotting process and over blanching is actually called cooking, which you can do, but isn't the goal here. 

So, now we blanch.  I had pretty good luck with it last year.  I dehydrated a lot of stuff, but the greens I did freeze came out better.  I decided not to dehydrate as much of my greens this year because they just crumble. So, while they can be added to soups and casseroles as a seasoning, there's never any greens in them. I also froze pepper strips, blanched, but they tasted, um, like frozen peppers...so we still have some.  I found they were usable only in sausage and peppers, covered in sauce.  And eggplant.  I froze a bunch of peeled, sliced, blanched eggplant.  Yeah, we still have most of that left also. 

How to blanch?

1. Wash and Chop your greens.  I like to make them into the basic size I would use them in cooking. For me, part of the benefit of doing all this work in the summer is to make the winters really, really easy.
2. Bring a pot of water to a boil. Prepare a large bowl of ice water in the sink.  This is to put the veggies in after they are blanched to stop them from cooking.  

3.  Put the greens in the water in batches not too big for the pot.  (Isn't that helpful?)  I basically blanch them one bunch at a time (this seems to be about a pound).  You want to make sure the pot isn't so full that the leaves get stuck together, and so don't get blanched.
4. Blanch them for only 2 1/2 minutes.
5. Take them out and plunge them int the ice water. 
This job is a lot easier  If you have a metal basket like this. It is tricky to fish the greens out of the water when the time is up without over cooking them. 
6. After they are cooled completely put them in a colander while you finish of the next batch.

7. Label what it is with the date and freeze them in a freezer bag with as much of the air squeezed out as possible.  If you're iffy about plastic you can use mason jars, just don't fill them too much. I vacuum seal them, but I do find that this is tricky because as the water gets sucked up it prevents the bag from getting a really good seal.  I have found two ways of dealing with this, one press the "seal" button on the vacuum sealer before it's done really vacuuming (and so hasn't had enough time to suck the water up).  I'm not sure all machines have this capability.  The other thing I found works pretty well is to place some paper towels or coffee filters above the food inside the bag.  This way the water gets absorbed into this and doesn't interfere with the seal.
 That's it! Then just wait to unity you would maim someone for a leafy veggie and thaw out the mustard greens!